When browsing the internet, encountering a DNS error in Google Chrome can be frustrating. These errors often result from issues with Chrome’s DNS cache, network configurations, or corrupted browser data. Fortunately, resolving such errors is straightforward. This blog provides a detailed step-by-step guide to clearing chrome net internals dns using the chrome://net-internals tool, along with other troubleshooting techniques.
What is a DNS Error in Chrome?
DNS (Domain Name System) translates domain names into IP addresses so that browsers can connect to websites. A DNS error typically indicates that the browser could not resolve the domain name to its corresponding IP address, resulting in pages not loading. Common causes include:
- Cached DNS entries.
- Network configuration errors.
- Expired or incorrect DNS records.
Steps to Clear Chrome Net Internals DNS Error
Google Chrome offers a built-in tool called chrome://net-internals, which allows users to manage network-related configurations, including DNS. Follow these steps to resolve DNS errors:
1. Access Chrome’s Net Internals Page
The net-internals page is a hidden feature in Chrome where you can manage network settings.
- Open Google Chrome.
- In the address bar, type chrome://net-internals and press Enter.
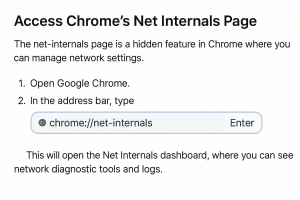
This will open the Net Internals dashboard, where you can see network diagnostic tools and logs.
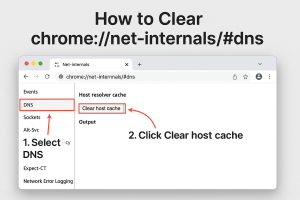
2. Clear the DNS Cache
Once you are in the Net Internals page, follow these steps to clear the DNS cache:
- From the left-hand menu or dropdown, select DNS.
- Click the Clear host cache button.
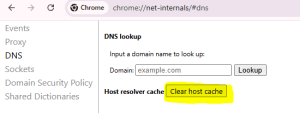
This action clears all DNS entries cached by Chrome. Cached entries can sometimes become outdated or corrupted, leading to DNS errors.
3. Flush Sockets
After clearing the DNS cache, it’s essential to flush Chrome’s sockets to ensure the browser doesn’t use old or invalid connections.
- In the net-internals page, switch to Sockets (if it’s visible in the menu).
- Click Flush socket pools.
![]()
This step closes all active connections, forcing Chrome to establish new ones when accessing websites.
4. Restart Chrome
To ensure all changes take effect, restart Google Chrome:
- Close the browser completely.
- Open Chrome again and try reloading the website.
Additional Troubleshooting Steps for DNS Errors
If clearing the DNS cache using chrome://net-internals doesn’t resolve the issue, try these additional methods:
1. Clear System DNS Cache
The DNS cache is not limited to Chrome; your operating system also stores DNS records. Clearing the system DNS cache can help:
Windows:
Open the Command Prompt (Run as Administrator).
Type the command:
bash
ipconfig /flushdns
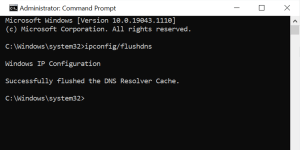
Press Enter. You will see a confirmation message indicating that the DNS Resolver Cache was successfully flushed.
macOS:
Open Terminal.
Enter the following command:
bash
sudo dscacheutil -flushcache
Enter your password when prompted.
Linux:
Open Terminal.
Restart the DNS service by typing:
bash
sudo systemd-resolve –flush-caches
2. Reset Network Settings
Network misconfigurations can also lead to DNS errors. Resetting network settings may resolve the issue.
Windows:
Open Command Prompt (Admin).
Run the following commands one by one:
bash
netsh winsock reset
netsh int ip reset
Restart your computer.
macOS:
-
- Go to System Preferences > Network > Advanced.
- Remove and re-add your current network configuration.
3. Change DNS Servers
Sometimes, the DNS server provided by your ISP may cause problems. Switching to a public DNS can resolve the issue.
- Go to your network settings.
- Change the DNS servers to one of the following:
- Google DNS:
- Primary: 8.8.8.8
- Secondary: 8.8.4.4
- Cloudflare DNS:
- Primary: 1.1.1.1
- Secondary: 1.0.0.1
- Google DNS:
Save the settings and restart your connection.
4. Clear Browser Cache and Cookies
Corrupted browser data can also cause DNS errors. To clear Chrome’s cache and cookies:
- Go to Settings > Privacy and security > Clear browsing data.
- Select Cookies and other site data and Cached images and files.
- Click Clear data.
5. Check Firewall or Antivirus Settings
Overprotective firewalls or antivirus software can block DNS requests. Temporarily disable these and test if the issue persists. If the problem is resolved, whitelist Chrome in your firewall or antivirus settings.
6. Verify Internet Connection
Ensure your internet connection is stable. Reboot your router or modem and reconnect to the network.
Preventing DNS Errors in the Future
To minimize the chances of encountering DNS errors in Chrome, consider these tips:
- Keep Chrome Updated: Regular updates fix bugs and enhance network stability.
- Use Reliable DNS Services: Opt for public DNS services like Google DNS or Cloudflare DNS for faster and more reliable DNS resolution.
- Regularly Clear DNS Cache: Periodically clear your DNS cache to prevent outdated or corrupted entries.
- Monitor Network Health: Check your network and internet connection for stability issues.
Why Do You Need to Clear the Host Cache?
When browsing the internet, you may encounter loading issues, slow website access, or DNS errors in your browser. One effective troubleshooting step is clearing the host cache, which helps refresh stored domain name resolutions and ensures a smooth browsing experience. But why is this necessary? Let’s dive into the importance of clearing the host cache and how it benefits your internet performance.
What is the Host Cache?
The host cache is a temporary storage system used by web browsers and operating systems to store DNS lookups. When you visit a website, the browser resolves the domain name to an IP address and saves it in the cache. This allows faster loading times when revisiting the same site, as it eliminates the need to perform a new DNS lookup.
Why Should You Clear the Host Cache?
Over time, the host cache may contain outdated or corrupted entries, leading to various browsing issues. Here are the key reasons why clearing the host cache is beneficial:
1. Fixing DNS Errors
If a website fails to load due to a DNS error, the stored cache may contain an outdated or incorrect IP address. Clearing the host cache forces the browser to fetch the latest IP address from the DNS server, resolving connectivity issues.
2. Resolving Website Loading Issues
Sometimes, websites fail to load or display properly due to outdated DNS records in the cache. Clearing the host cache ensures that the browser retrieves fresh DNS information, allowing the site to function correctly.
3. Improving Network Performance
An overloaded or corrupted host cache can slow down browsing performance. Flushing the cache clears unnecessary stored records, optimizing the browser’s efficiency in handling DNS requests.
4. Updating Website Changes
If a website has changed its IP address or moved to a new server, your browser may still try to connect using the old cached data. Clearing the host cache ensures that you access the latest version of the site without any connectivity issues.
5. Enhancing Security
Cyber attackers sometimes use DNS poisoning or spoofing techniques to redirect users to malicious sites. Clearing the host cache removes potentially compromised DNS entries, reducing the risk of security threats.
6. Refreshing Network Configurations
If you have recently changed your network settings, such as updating DNS servers or switching networks, clearing the host cache helps apply these changes without conflicts from old cached data.
Clearing the host cache is a simple yet effective way to resolve browsing issues, improve network performance, and enhance security. Whether you’re troubleshooting DNS errors or ensuring up-to-date website access, periodically clearing the cache helps maintain a seamless internet experience. If you encounter persistent DNS problems, consider updating your DNS settings or contacting your ISP for further assistance.
Conclusion
DNS errors in Chrome can disrupt your browsing experience but are relatively easy to fix using the built-in chrome://net-internals tool. By clearing the DNS cache, flushing sockets, and performing additional troubleshooting steps, you can quickly resolve these errors. Regular maintenance of your browser and network settings can prevent future occurrences.
If the problem persists despite following these steps, it may be due to server-side issues or deeper network misconfigurations. In such cases, contacting your ISP or a network administrator can help.
With this comprehensive guide, you should now be equipped to tackle DNS errors confidently and ensure a smooth browsing experience.
Frequently Asked Questions
1. What is chrome://net-internals/#dns in Google Chrome?
chrome://net-internals/#dns is a diagnostic tool in Google Chrome that allows users to view and manage the browser’s DNS cache. It helps troubleshoot issues related to DNS resolution and connectivity.
2. Why should I clear the DNS host cache in Chrome?
Clearing the DNS host cache removes outdated or corrupted DNS entries that may cause website loading errors or misdirection. It’s a quick fix to resolve many common browsing issues.
3. How do I clear the DNS cache using chrome://net-internals/#dns?
-
Open Chrome and type
chrome://net-internals/#dnsin the address bar. -
Click the “Clear host cache” button.
-
Optionally, navigate to the Sockets tab and click “Flush socket pools” for a complete reset.
4. Will clearing the DNS cache affect my browsing experience?
Temporarily, Chrome may take slightly longer to load websites for the first time after clearing the cache, as it fetches fresh DNS records. However, this improves accuracy and performance in the long run.
5. How often should I clear the DNS cache?
There’s no fixed frequency, but it’s recommended to clear the cache when:
-
You face DNS errors or website loading issues.
-
Websites are not resolving correctly.
-
You’ve changed DNS settings or hosts.
6. What should I do if clearing Chrome’s DNS cache doesn’t fix the issue?
Try additional steps such as:
-
Flushing your system DNS cache (via Terminal or Command Prompt).
-
Changing DNS servers (e.g., to Google DNS or Cloudflare).
-
Restarting your router.
-
Checking your firewall or antivirus settings.