How to Clear Chrome Net Internals DNS: A Comprehensive Guide
In today’s internet-driven world, browsing issues can significantly hamper productivity and user experience. One standard yet often overlooked solution to various Chrome browser problems is clearing the DNS cache through Chrome’s Net Internals tool. Whether you’re experiencing website connectivity issues, seeing outdated content, or troubleshooting network problems, understanding how to manage Chrome’s DNS cache can be incredibly valuable.
What is Chrome Net Internals DNS?
Before diving into the clearing process, it’s essential to understand what Chrome Net Internals DNS is. Chrome maintains its internal DNS cache separate from your operating system’s cache. This DNS (Domain Name System) cache stores information about website addresses you’ve visited to speed up future visits by avoiding repeated DNS lookups.
The Net Internals interface is Chrome’s built-in diagnostic and configuration tool that gives users access to Chrome’s networking subsystems, including the DNS cache. While not widely known among average users, this powerful tool provides insights into how Chrome handles network connections and offers ways to troubleshoot connection issues.
Why Should You Clear Chrome’s DNS Cache?
There are several situations where clearing Chrome’s DNS cache becomes necessary:
- Website Updates Not Showing: If a website has recently been updated but you’re still seeing old content, your DNS cache might be holding onto outdated information.
- Connection Errors: Experiencing “This site can’t be reached” or similar errors? A corrupted DNS cache entry could be the culprit.
- Changed IP Addresses: If a website has moved to a new server (changing its IP address), your cached DNS information might direct you to the old location.
- Security Concerns: DNS spoofing attacks can manipulate your DNS cache to redirect you to malicious sites. Clearing the cache helps mitigate this risk.
- After Network Changes: If you’ve changed networks or updated your router configuration, clearing the DNS cache ensures Chrome uses the most current network settings.
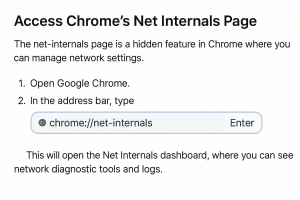
How to Access Chrome Net Internals
The process to access Chrome’s Net Internals interface is straightforward:
- Open your Chrome browser.
- In the address bar, type: chrome://net-internals/ and press Enter.
- This takes you to Chrome’s network internals page with various tabs and options.
Step-by-Step Guide to Clearing Chrome’s DNS Cache
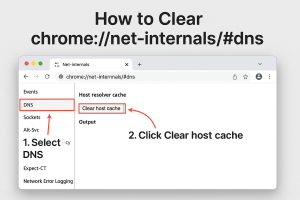
Method 1: Using the DNS Tab
- Navigate to chrome://net-internals/#dns in your Chrome browser.
- Look for the “Clear host cache” button on the right side of the page.
- Click this button to flush Chrome’s DNS cache.
- There’s no confirmation dialog – the operation happens instantly.
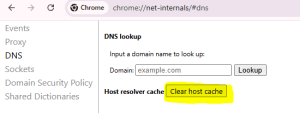
Method 2: Using the DNS Pane in Net Internals
- Go to chrome://net-internals/ in your Chrome browser.
- In the left sidebar, locate and click on “DNS”.
- On the right pane, find and click the “Clear host cache” button.
- The DNS cache will be cleared immediately.
Method 3: Using the Chrome Developer Tools
For those who prefer using Chrome’s Developer Tools:
- Press Ctrl+Shift+I (Windows/Linux) or Cmd+Option+I (Mac) to open Developer Tools.
- Click on the “Network” tab.
- Check the “Disable cache” checkbox to prevent Chrome from using cached DNS entries.
- Right-click the refresh button in Chrome and select “Empty Cache and Hard Reload”.
Verifying the DNS Cache Has Been Cleared
After clearing the DNS cache, you might want to verify that the operation was successful:
- Return to the chrome://net-internals/#dns page.
- Look at the “Host Resolver Cache” section.
- The entries should be minimal or empty, depending on your browsing activity since clearing the cache.
Troubleshooting Beyond DNS Cache Clearing
If you’re still experiencing issues after clearing Chrome’s DNS cache, here are additional steps to try:
Clear Your OS-Level DNS Cache
Different operating systems store their own DNS caches separate from Chrome:
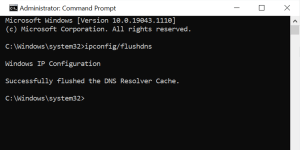
Windows:
- Open Command Prompt as Administrator.
- Type ipconfig /flushdns and press Enter.
- You should see a confirmation message: “Successfully flushed the DNS Resolver Cache.”
macOS:
- Open Terminal.
- For macOS Monterey, Big Sur, Catalina, and Mojave, type: sudo dscacheutil -flushcache; sudo killall -HUP mDNSResponder
- Enter your administrator password when prompted.
Linux:
- Open Terminal.
- Type sudo systemd-resolve –flush-caches or sudo service nscd restart, depending on your distribution.
Clear All Chrome Browsing Data
A more thorough approach is to clear all browsing data:
- Go to Chrome settings by typing chrome://settings/ in the address bar.
- Scroll down and click on “Advanced” to expand additional options.
- Under “Privacy and security,” click the “Clear browsing data.”
- Select “All time” from the time range dropdown.
- Check “Cookies and other site data” and “Cached images and files.”
- Click “Clear data.”
Reset Chrome Network Settings
If issues persist, you can reset Chrome’s network stack:
- Navigate to chrome://net-internals/#sockets
- Click on “Close idle sockets” and “Flush socket pools.”
- Go to the “DNS” tab and clear the host cache again.
- Finally, visit the “Proxy” tab and click “Re-apply settings.”
![]()
When to Clear Chrome’s DNS Cache Regularly
While there’s no one-size-fits-all schedule, consider clearing Chrome’s DNS cache:
- Monthly Maintenance: As part of regular browser maintenance if you’re a heavy internet user.
- After Network Changes: Any time you connect to a new network or make changes to your network configuration.
- When Troubleshooting: At the first sign of connection issues or when websites aren’t loading correctly.
- After Security Incidents: If you suspect any security issues with your browsing or network.
Advanced Settings in Chrome Net Internals
For advanced users, Chrome Net Internals offers additional diagnostic features:
- Events Capturing: Under the “Events” tab, you can capture and export Chrome network events for detailed analysis.
- Connection Testing: The “Connection” tab allows testing specific host connections.
- Proxy Configurations: View and manage Chrome’s proxy settings under the “Proxy” tab.
Security Considerations
Remember that clearing your DNS cache doesn’t provide anonymity or enhance general security – it simply ensures you’re accessing the most current DNS information. For comprehensive privacy and security:
- Consider using a trusted VPN service.
- Keep Chrome updated to the latest version.
- Use secure DNS services like Google Public DNS or Cloudflare’s 1.1.1.1.
- Regularly scan your system for malware that might manipulate DNS settings.
Conclusion
Clearing Chrome’s Net Internals DNS cache is a simple yet effective troubleshooting technique that often resolves common browsing issues. By understanding when and how to perform this maintenance task, you can ensure smoother browsing experiences and quicker resolution to network-related problems.
Remember that DNS cache clearing is just one tool in your troubleshooting arsenal. Combining it with other maintenance practices like clearing cookies, updating your browser, and maintaining your operating system will provide the best overall browsing experience.
Whether you’re a casual internet user or a network administrator, having this knowledge in your technical toolkit can save you time and frustration when confronted with Chrome browsing issues. The next time you encounter strange browser behavior or connection problems, remember to check Chrome’s DNS cache – the solution might be just a few clicks away.
FAQs: How to Clear Chrome Net Internals DNS
-
What is Chrome Net Internals DNS cache?
Chrome Net Internals DNS cache is Chrome’s internal storage system that saves website domain name resolutions (converting domain names to IP addresses), allowing faster access to previously visited websites by avoiding repeated DNS lookups.
-
Why should I clear my Chrome DNS cache?
Clearing Chrome’s DNS cache can help resolve various browsing issues, such as websites not loading properly, slow page responses, or errors like “DNS_PROBE_FINISHED_NXDOMAIN.” It ensures that Chrome retrieves the latest IP addresses for websites instead of using outdated or incorrect cached data. This is particularly useful if a website has recently changed its hosting server.
-
How do I access Chrome Net Internals?
Type “chrome://net-internals/” in Chrome’s address bar and press Enter. This will open built-in Chrome’s network diagnostic interface that allows users to view and manage DNS-related configurations and network settings.
-
What’s the quickest way to clear Chrome’s DNS cache?
The quickest way is to type “chrome://net-internals/#dns” in the address bar and click the “Clear host cache” button.
-
How often should I clear Chrome’s DNS cache?
There’s no fixed schedule, but it’s good practice to clear it when troubleshooting connection issues, after changing networks, or monthly if you’re a heavy internet user.
-
What’s the difference between Chrome’s DNS cache and my OS cache?
Chrome maintains its own separate DNS cache from your operating system. Clearing Chrome’s cache affects only the browser, while OS-level cache (cleared through commands like ipconfig /flushdns on Windows) affects all applications.
-
Is clearing DNS cache the same as clearing browser cache?
No, they’re different. DNS cache stores domain-to-IP address mappings, while browser cache stores website content like images and page elements. Clearing the DNS cache won’t remove stored website content.
-
Does Incognito mode use the same DNS cache?
Yes, Chrome’s DNS cache is shared between regular and Incognito browsing sessions because DNS resolution is a browser-wide function.
-
Can DNS cache issues create security vulnerabilities?
Yes, outdated DNS entries could potentially redirect you to incorrect or malicious IP addresses if a website has moved or if your DNS has been compromised. Regular clearing helps mitigate this risk.
-
Why does Chrome have its own DNS cache separate from my system?
Chrome maintains its own cache to optimize browser performance independently of the operating system, giving Chrome more control over its networking behavior and potentially faster website loading times.